Updated 21/03/2025
Google Analytics is known for its ability to track website visits and the behavior of the audience on a given website periodically. It has evolved a lot since its launch in 2005.
It should interest you to know the importance of using Google Analytics (GA) and how it plays an important role to enhance your business performance or your website.
When you think of it critically, this tool collects a massive amount of data which is then processed to understand the behavior of your website audience and improve their user experience.
It also plays a very important role in your advertising campaigns through the analytics tracking code.
The best part of it all is that analytics is owned by Google. It has always been free and hopefully, it will be for a long time to come
So let’s take a look at what really makes GA so powerful and unique as a business tool.
Table of Contents
ToggleWhat is Google Analytics? (GA)
Google Analytics is a web analytics service offered by Google that tracks and reports website traffic, currently as a platform inside the Google Marketing Platform brand. Google launched the service in November 2005 after acquiring Urchin. (Source: Wikipedia).
To put differently, Google Analytics is like your website’s personal spy—minus the shady business. It’s a free tool from the Google Marketing Platform that helps you track what’s popping on your site, who’s visiting, and how they’re interacting with your content. Whether you’re running a big-time enterprise or just hustling with a small business, as long as you have a Google account, you’re good to go.
With Google Analytics, you can see where your traffic is coming from, check if your marketing campaigns are actually doing the job, and track important goals—like purchases, sign-ups, or even just people adding stuff to their carts. It also breaks down visitor demographics, trends, and engagement patterns so you can tweak your strategy and keep your audience hooked.
For small and mid-sized retail websites, this tool is a goldmine. It helps businesses understand customer behavior, fine-tune marketing efforts, boost traffic, and keep visitors coming back for more.If you’re serious about growing your online presence, Google Analytics isn’t just useful—it’s a must-have.
To marketers and business owners that want a complete web analytical tool for their website, advertising performance reports or generally gathering intelligence on their audience, GA is a necessity.
You just have to use it every day in order to get informative and outstanding reports on your website audience.
Given its importance, there is one important question I will like to answer before moving on which is “Is Google analytics free?
Is Google Analytics Free?
Google Analytics is free. However, analytics 360 which is another version of google analytics is not completely free.
Analytics 360 is for bigger brands that need to share data across multiple employees and implement more complex analytical tasks.
If you are a small business or medium-sized business, the free google analytics is sufficient as it got all you need to collect all the necessary data for further data processing.

In summary, the free version of GA should be enough for most webmasters.
Google Analytics Dashboard
Let’s take a look at what you will find on the dashboard of analytics and how to navigate through it.
The traditional analytics dashboard contains the audience overview and acquisition behavior overview.
Let’s look at what you can find in each of them.
Audience Overview
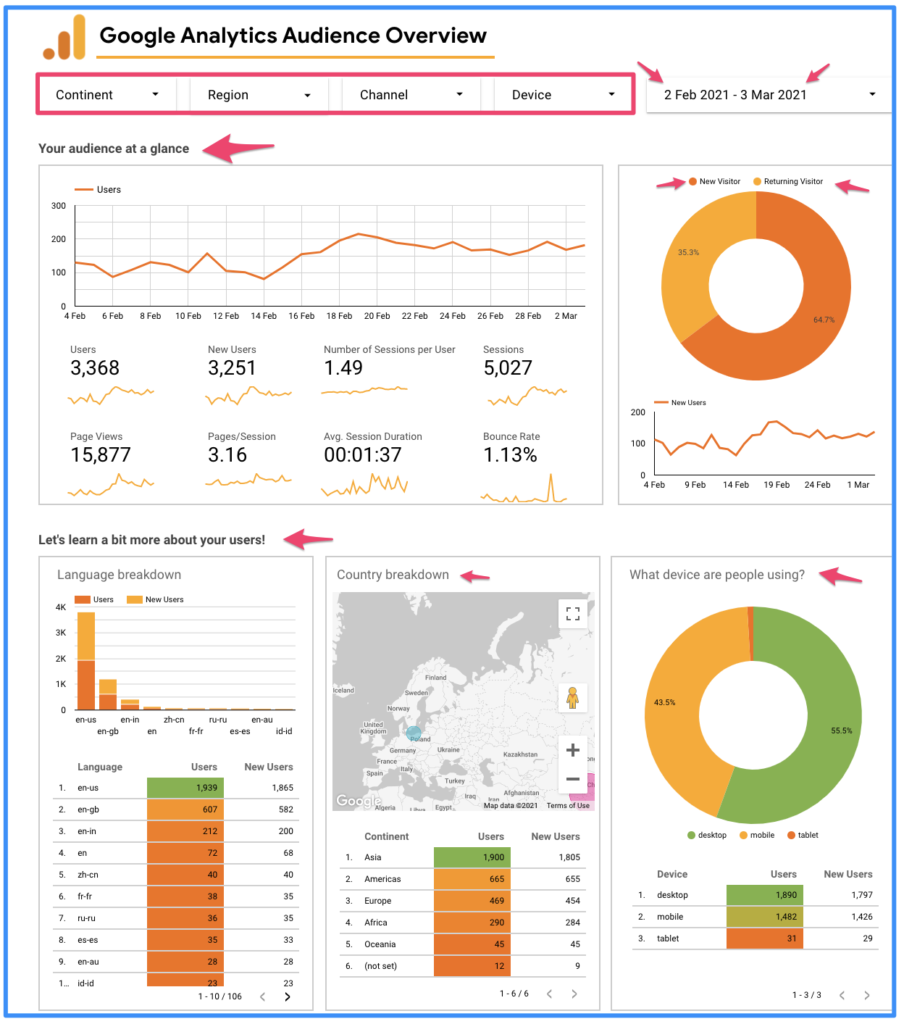
In this section of GA, you will find all the data about your audience. Here you will find the number and percentages of your new and returning visitors, sessions, and the number of sessions per user.
Data on their GEOs such as country, language, and the devices used in accessing your website is displayed in the audience dashboard.
Acquisition overview
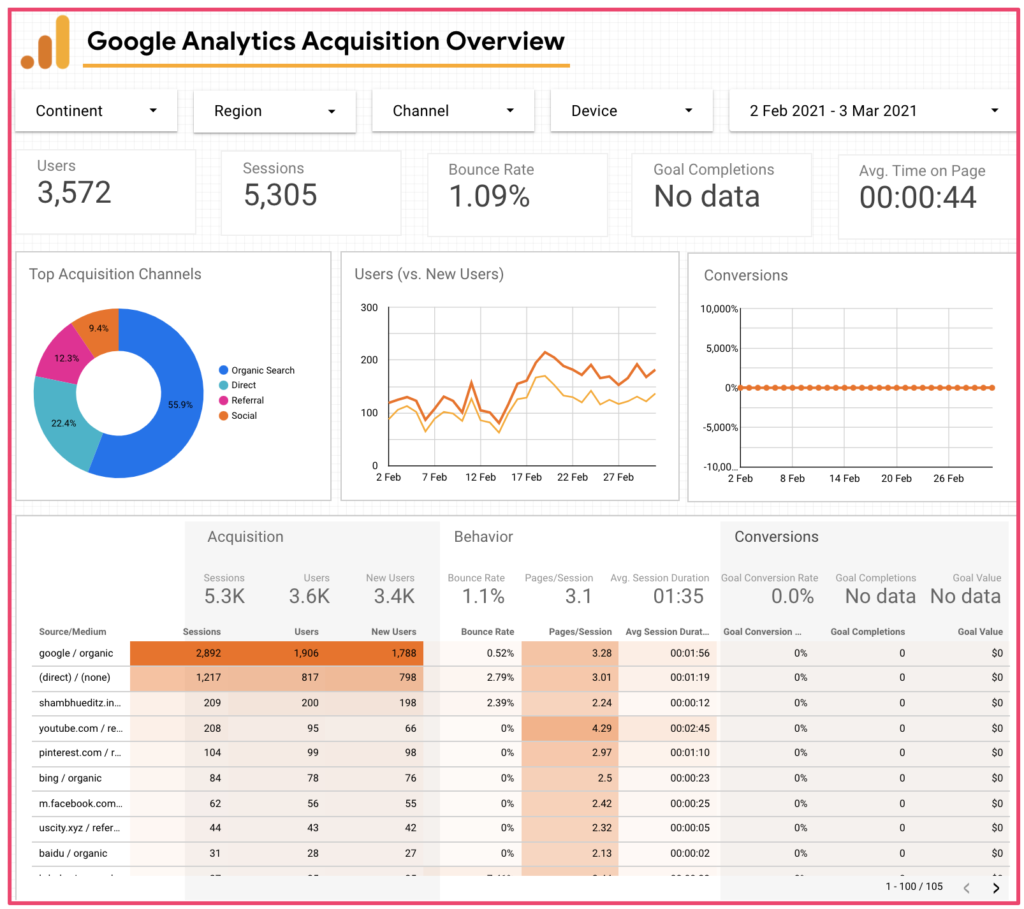
Here you get data on your acquisition audience which shows who is converting, and which source they are coming from as well as their bounce rate, pages/sessions, and a percentage of those new and old audiences who are converting or making purchases.
You will be able to view your audience data based on their continent, regions, channel, bounce rate, Goal completion, and average time on the page. All this data is designed to equip you with the knowledge of what to focus on the most.
Behavior Overview
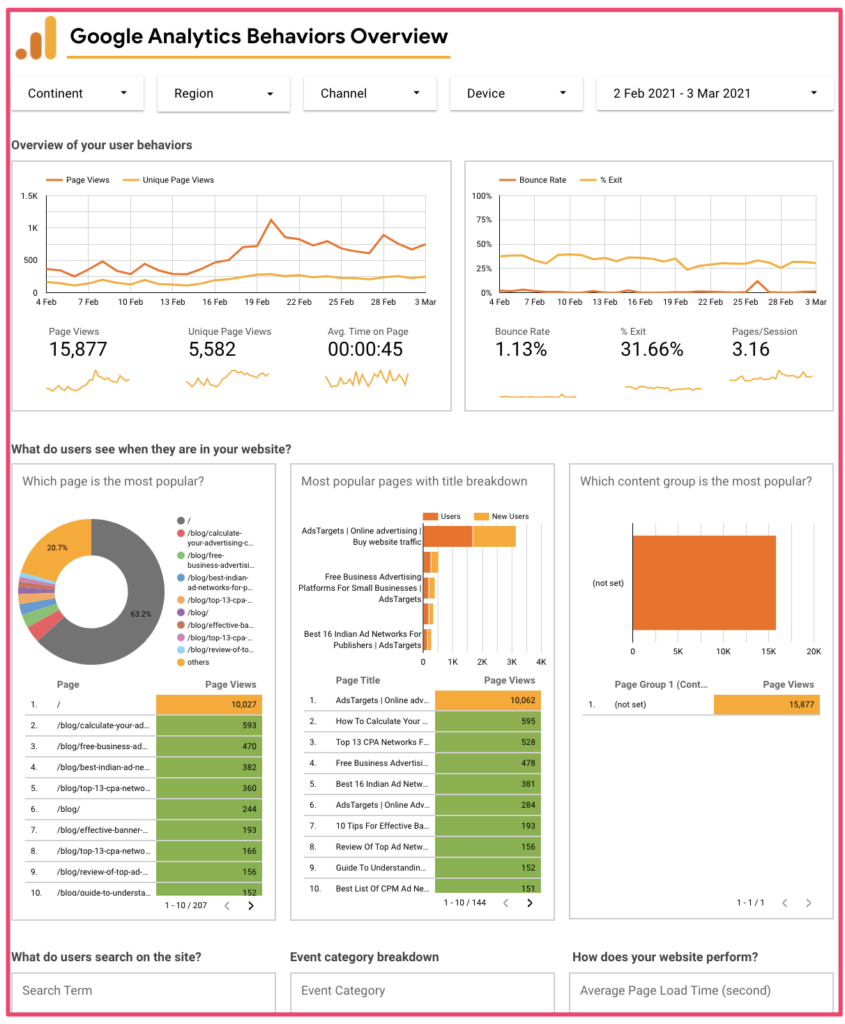
Here you have the stats on your audience behavior such as page views, unique page views, and average time on page, as shown in the first left section below.
Stats on bounce rate, Exit percentage, and pages/sessions are all shown here. Then you have stats on specific pages which bring you the most traffic and the percentage of the traffic from each page, The percentage of new and old users based on pages, and page groups based on popularity.
Apart from that, data on what user search on your website, even category breakdown, and the performance of your website over a period of time is as well shown.
Google Analytics Setup
Now that you have a clear understanding of what to expect with the main dashboard of analytics, you can agree with me that it’s actually a lot of valuable information to get here.
So here let’s take a look at how to set up Google Analytics on your website to start collecting data.
This can be easily done in few steps and here is it.
Setting up analytics is easy and fast, if you already have a Google account, you can easily use it to create your analytics account. If you don’t have one yet, you can an create account.
Once you are on the Google Analytics signup page, you will see the “Start using Google Analytics” and click on Sign up.

Once you sign up and log in, navigate to admin to start the setup process. here you are required to enter your analytics account name, for example, It can be your site name “Mysite”.
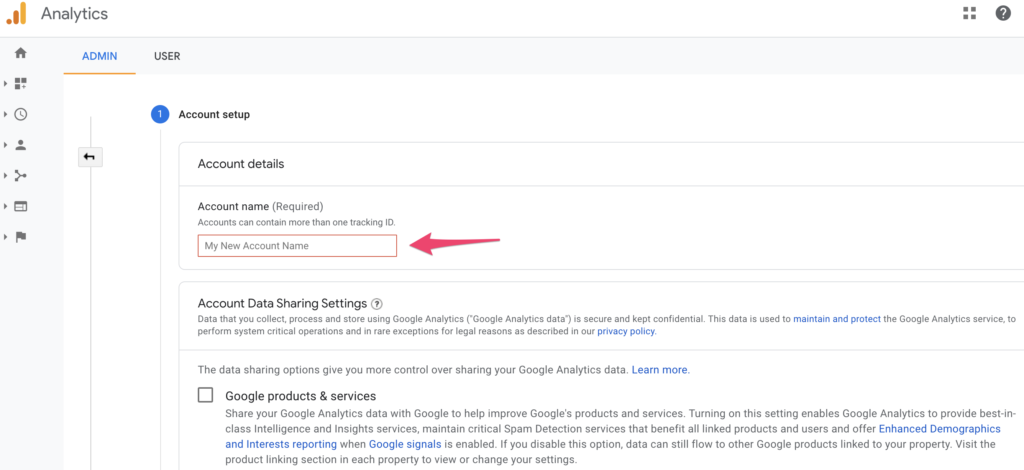
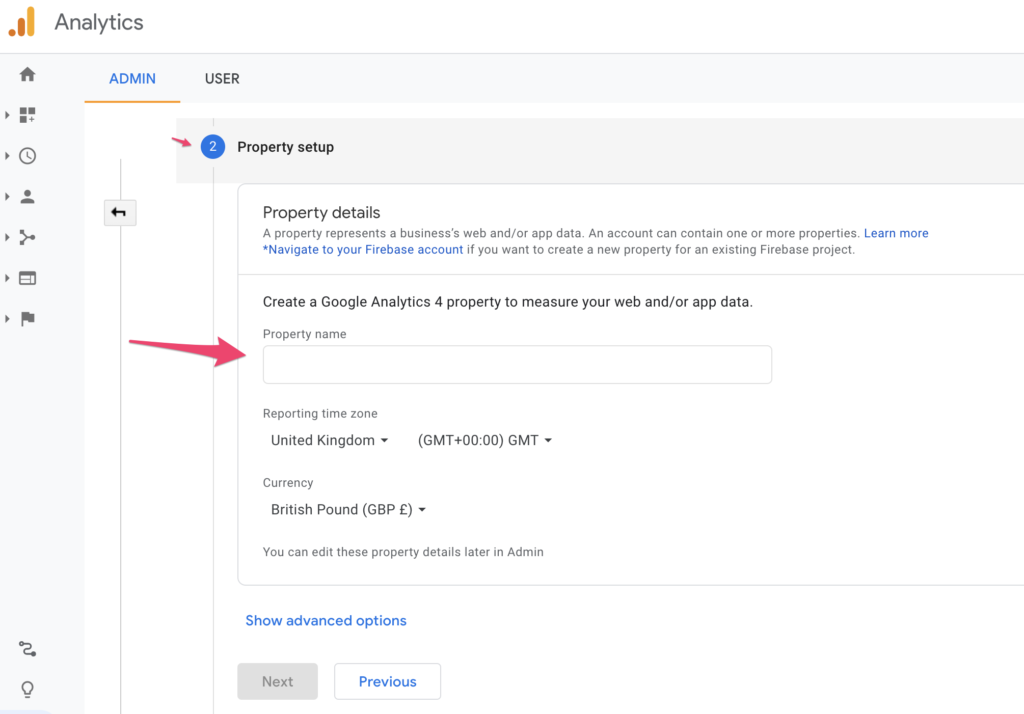
Next stage you are required to enter the property name under the property set. You can also choose your reporting time zone and currency here and click on “next”.
The third stage is to fill in your business information. Analytics need to know more about the size of your business and what is more important for your business to measure.
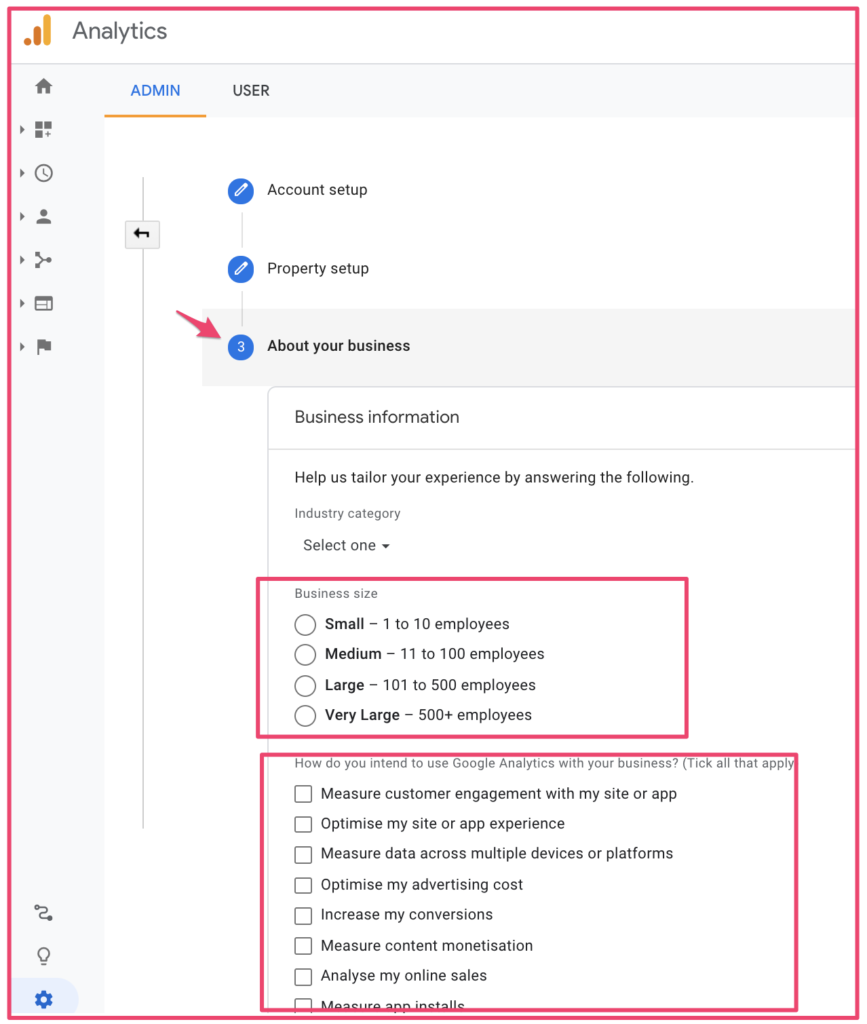
Fill in the details and then click on create as shown below.
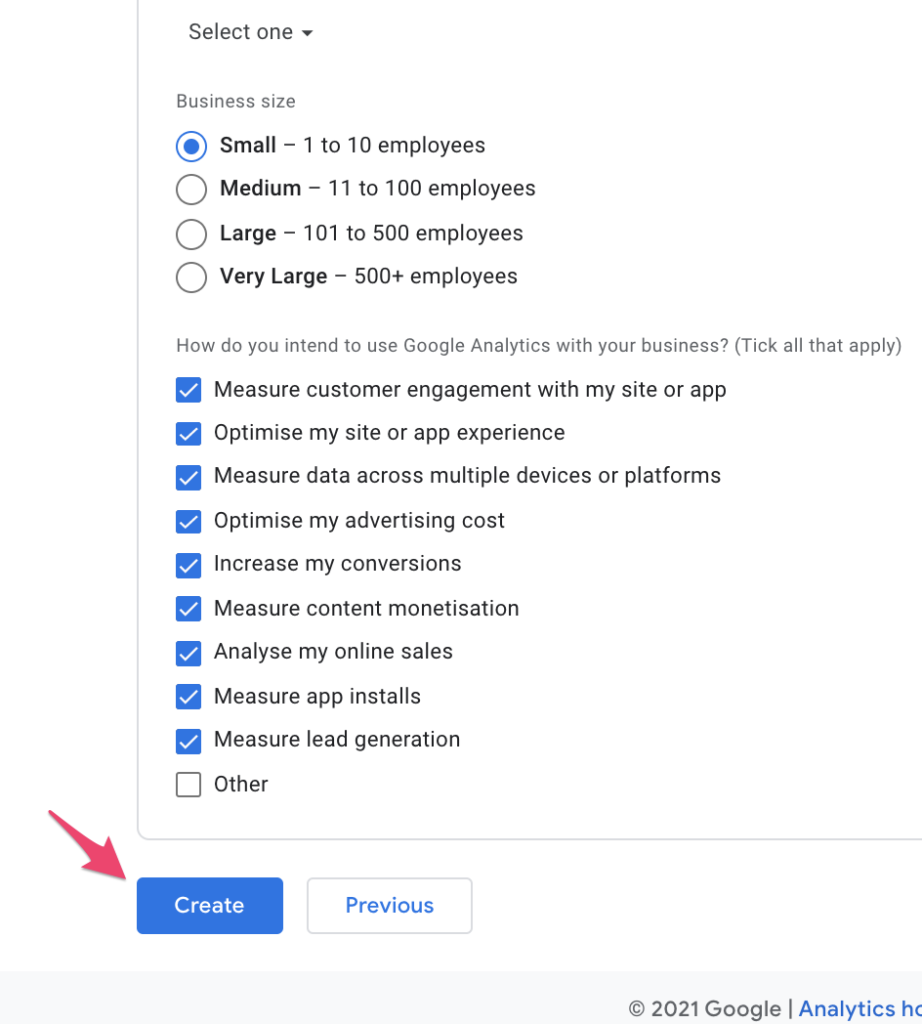
Once you click on “create”, you will be taken to the last stage where you will need to accept the Google Analytics terms of service agreement.
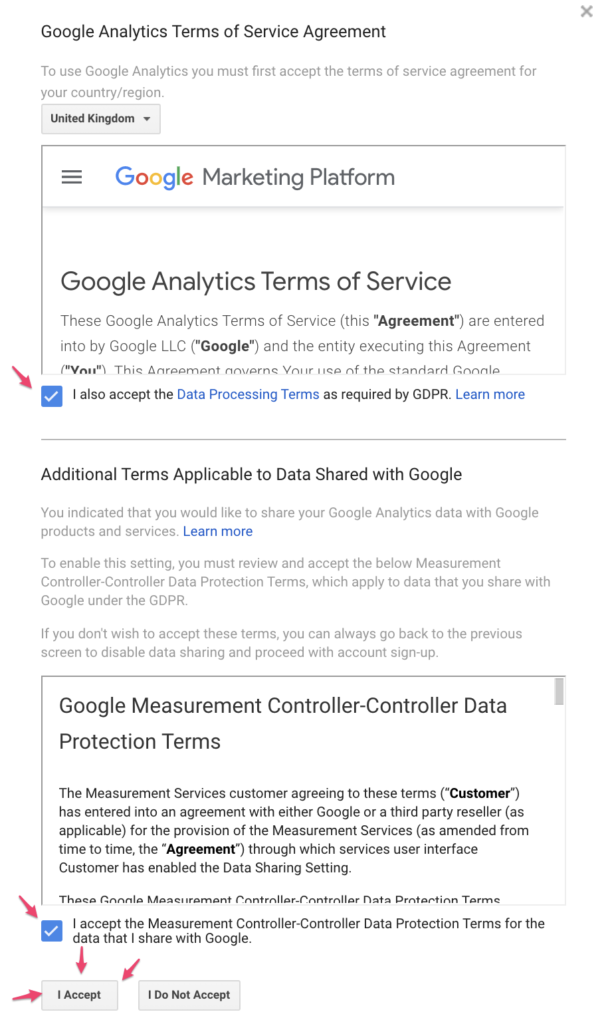
One you have accepted the terms and agreement. You will be taken to the next page where you will start setting up data stream to start collecting data.

Basically from here, you will need to proceed to create a “Tracking ID” and add the tags to your website to start collecting data.
Google Analytics Tacking ID
Analytics tracking ID and the Tracking code can be set in various ways depending on your site and other third-party tools like Google tag manager
The tracking ID is used by third-party add-ons, and plugins to enable the linkages between analytics and the connection website.
This is mostly used in WordPress and other tools designs to integrate GA.
Setting up Analytics Tracking Code
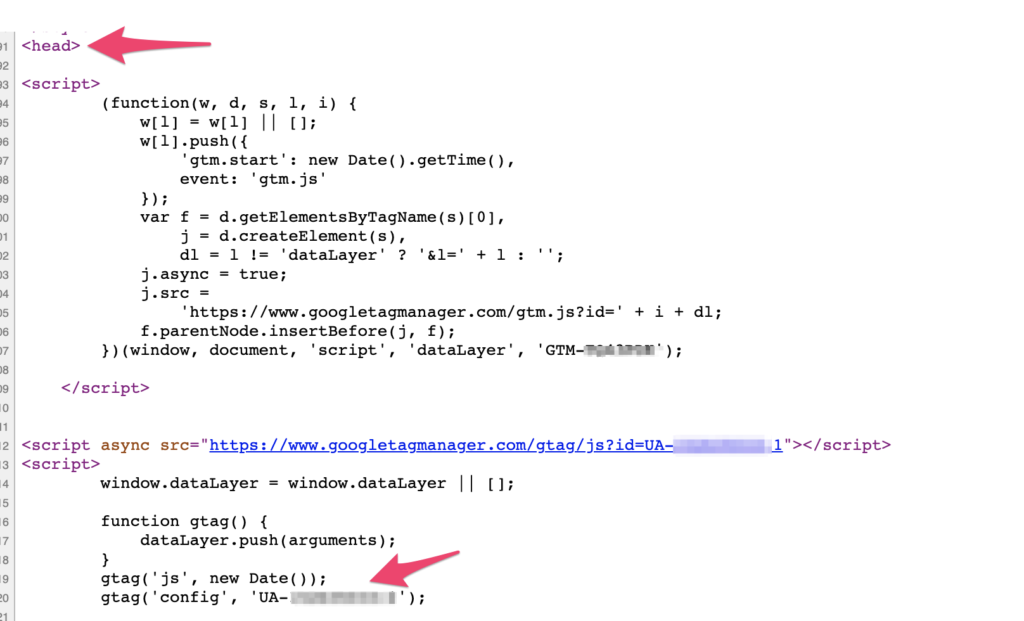
The analytics tracking code is used to link your website and GA for data collection. It’s this code that makes it possible for the data to be collected from your website. It is necessary to add the analytics code in the header section of your website to enable effective data collection.
In the image below, you will see the analytics code is integrated through Google tag manager in the header section of the website. This is how you must add the code for it to effectively track the events on your website.
Google Analytics on WordPress
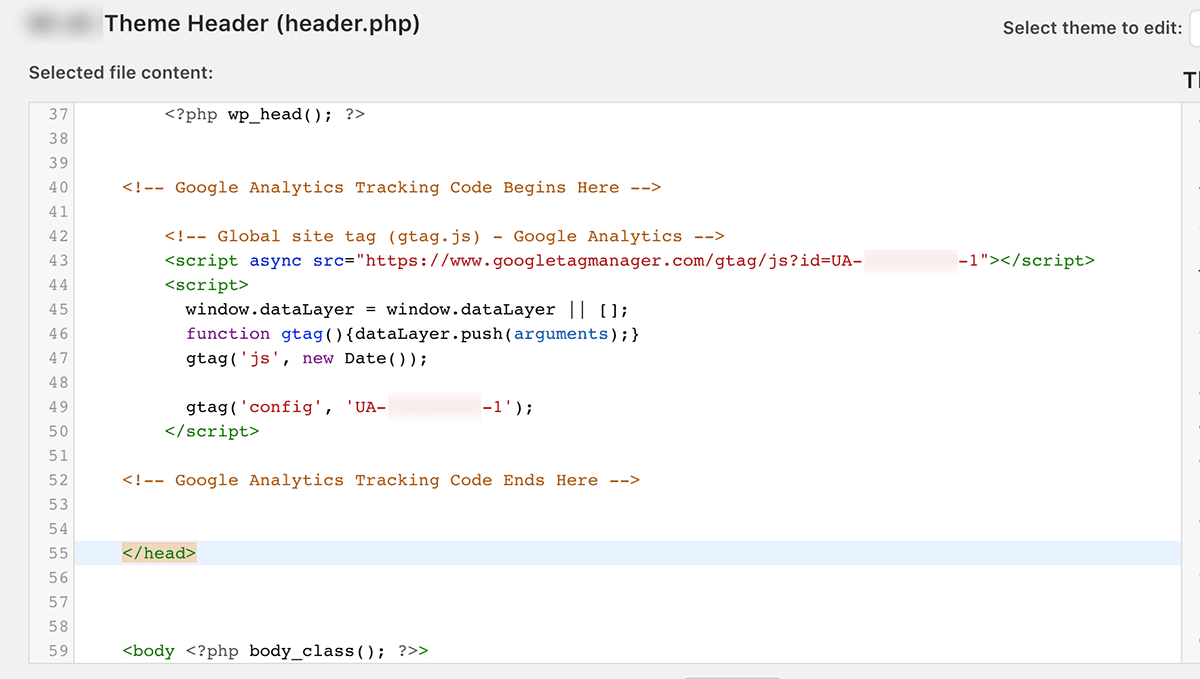
Installing or integrating analytics in WordPress is simple and can be done in several ways.
The first method is to add the analytics code in the header section of your index file or your home page.
Another method is to add the code using a plugin called the “Header and Footer”. If you already have the plugin, all you need is to include the analytics code in the header section of the plugin and save the changes.
Once that’s done, you will have to wait for a few days for the data to start showing in your WordPress dashboard and your analytics dashboard.
Using Analytics to Improve Website Performance
The whole point of analytics is simple—giving you the inside scoop on what’s working (and what’s flopping) so you can level up your website’s performance and, ultimately, your business. That’s where Google Analytics comes in. It’s like having a backstage pass to your own website, showing you all the juicy details you need to make smart moves.
Here’s the kind of goldmine Google Analytics hands you on a silver platter:
- Where your traffic is coming from – Are people finding you through Google, social media, referrals, or paid ads? Knowing this helps you double down on what’s working.
- Your top-performing pages – Which pages are pulling in the most visitors? Time to analyze why they’re working and replicate that magic elsewhere.
- Page load speed – If your site is slow, people will bounce faster than a bad first date. GA helps you pinpoint lagging pages so you can fix them before users bail.
- Bounce rate – Speaking of bailing, this tells you how many people leave after visiting just one page. If it’s high, something’s off—maybe your content, design, or page speed.
- Devices your audience is using – Are your visitors on mobile, tablet, or desktop? If most of them are on mobile and your site isn’t optimized for it, you’re leaving money on the table.
- Geolocation insights – Find out which countries (or even cities) your audience is coming from. Perfect for tailoring content, running targeted ads, or adjusting your strategy.
- Session duration – How long are people actually staying on your site? The longer, the better—it means they’re engaged.
- Live traffic data – Want to see what’s happening in real time? Google Analytics lets you watch visitors navigate your site as it happens.
- Acquisition data – Basically, how and where people are discovering your site. This helps you optimize marketing campaigns for better reach.
And that’s just scratching the surface. Google Analytics doesn’t just throw numbers at you—it hands you the insights you need to make smarter, data-driven decisions. So, if you’re not using it yet, you’re flying blind. Time to tap in and start tracking
All these insights help you make more informed decisions on improving your SEO to boost your traffic. With this data, you will figure out what is wrong with your website and figure out how to fix it to improve your site performance.
Also, based on what is already working for your website, you may decide to double on it to even get better results or gain more traffic.
This works very especially when you are running ad campaigns and decide to create goals or smart goals to see which ads are converting more so you can increase your efforts and increase your advertising ROI.
And What are Smart Goals?
When we talk of smart goals in analytics, we simply mean tracking event conversions which is very useful to help you understand which audience is converting more.
Not only for advertising but generally everyone that converts through any of your traffic sources is tracked using smart goals.
Basically, smart goals are completed events and they help ad networks, for example, understand which audiences are converting the most to help improve your Google Advertising campaigns using machine learning.
Setting up smart goals is not a must, but it is crucial when running online advertising campaigns.
Another way to get your analytics setup is with Tag Manager and here is the process
How To Set Up Analytics Tag with Google Tag Manager
Now you’ll learn how to set up specific Google Analytics tracking tags for your website.
Go to your Google Tag Manager dashboard and click on the Add a new tag button.
You will be taken to a page where you can create your new website tag.
On it, you’ll see that you can customize two areas of your tag:
- Configuration. Where the data collected by the tag will go.
- Triggering. What type of data do you want to collect?
Click on the Tag Configuration button to choose the type of tag you want to create.
You’ll want to choose the “Universal Analytics” option in order to create a tag for Google Analytics.
Once you click on that, you can choose the type of data you want to track. Do that and then go to “Google Analytics Setting” and choose “New Variable…” from the dropdown menu.
You’ll then be taken to a new window where you’ll be able to enter your Google Analytics tracking ID. This will send your website’s data straight into Google Analytics where you’ll be able to see it later.
Once this is done, head to the “Triggering” section in order to select the data you want to send to Google Analytics.
As with the “Configuration,” click on the Triggering button in order to be sent to the “Choose a trigger” page. From here, click on All pages so it sends data from all your web pages.
When all is said and done, your new tag setup should look something like this:
Now simply click on Save and voila! You have a new Google Tag tracking and sending data to your Google Analytics page about your website!
We’re not done yet, though. You still need to set up your goals — which brings us to…
Conclusion
It is vital to have Google Analytics set up for your website right from the beginning so you won’t miss any valuable data that would be part of your traffic optimization process.
GA is a pretty useful tool looking at all it offers for all webmasters. It’s simply impossible to do without when it comes to online business website optimization.
Get it set up today for your benefit if you have not yet done that. It’s free and easy to use.


