
Working with multiple platforms to manage the process of buying and selling ad species is always not an easy task. As a brand, it is always easy to use tools that can integrate and manage multiple tasks as fast and easily as possible.
Understanding this need, Google the Ad giant created a tool that allows both the sellers and buyers of ad spaces online to manage the process easier using Google Ad Manager.
In this post, we are going to explain how you can effectively use this great tool to manage your Ad spaces either as a media buyer or seller.
What is Google Ad manager
Google Ads Manager is an advert exchange medium that enables the buying and selling of ad spaces across a multitude of advertisement networks and locations, this network includes “AdSense” and “AdExchange.”
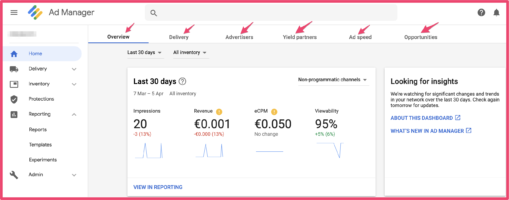
Google Ad Manager features
The major advantage of Google Ad Manager is the ability to run any type of campaign on it, furthermore, Google Ad Manager provides publishers with an optimized competition feature that enables the maximization of ad inventory yield across reserved and private market deals, and open auctions.
It is a lucrative platform that aids publishers gain much more revenue regardless of how they trade their Ad inventory.
Why Use Google Ad Manager?
Adsense is a lucrative and highly convenient product for publishers, however, it requires publishers to exchange potential to generate revenue from running Ads for an automated ad service and virtually no ad op man-hours.
Google Ads Manager is adopted by publishers when the necessity for advertising arises due to advert inquiries from advertisers or when a publisher`s platform reaches a level where it can increase profitability.
A further benefit of Google Ads Manager is it offers publishers the unique opportunity to control their inventory, publishers have access to sell advert spaces to advertisers directly or connect to many more programmatic providers.

Protecting the publisher`s inventory
Protecting your inventory from fraud is a challenge many publishers face, fraud can lead to difficult challenges, reducing user experience, malware challenges, and loss of brand reputation, Google Ads Manager has reliable tools in place to help publishers combat these challenges and protect ads displayed by publishers.
You may also like: Facebook Ads Manager: Ultimate Guide for advertisers
Creates opportunities in new areas
With the drastic evolution of content creation, people are using content wherever they may be, thus, it creates an opportunity for a new monetization avenue.
Also, it also creates a new challenge for establishing tags, yield groups for mobile applications, and determining the most beneficial advertising unit for publishers.
Thus, Google Ad Manager can utilize its single platform to manage, measure, optimize, and deliver publishers Ads across all these new platforms. all these challenges.
Increasing revenue through competition
Google Ads Manager offers publishers a competitive environment where advertisers can compete for their inventory, high competition means an increase in publishers’ revenue, furthermore, with an open bidding system in place, publishers can showcase their inventory to multiple demand partners with no security risks.
Unified Auction and Unified Pricing Rule
Unified auction grants ad networks, agencies, and exchange bidding via Google to possess an equal opportunity to bid for inventory, all bidding demands will obtain a simultaneous bid request from Google`s server.
This is required to run a single auction, rather than several demand-level auctions. Furthermore, Google adopts a unified pricing rule, which means a common pricing rule will be used to exchange bidding and Ad exchange.
Google Ad Manager for Small Businesses
Designed specifically the development for small and medium-sized businesses, Google Ad Manager creates access for impressions up to 150 million on a monthly basis for non-video ad units in the majority of countries worldwide, in the United States, Canada, Australia, and New Zealand alone about 90 million monthly, Google ad manager.
Moreso, It grants publishers access to some important number of features, such as access to the API, and to a limited number of reports including active view impressions, historical, reach, and standard or vast delivery.
How to Setup Google Ad Manager
To set up a Google Ad manager, publishers must first have Google Adsense, Adsense helps publishers navigate through Google’s multiple support pages, and helps set up Ad Manager.
Step 1: Creating Ad Units
Ad unit is the basic unit of Google Ad manager for inventory. it is the starting point where publishers have to pinpoint the exact spot on their website to be occupied by ads.
Next publishers must fill in the following fields respectively,
- Code: the name of your ad unit here.
- Name: it is advised that publishers use the same name as in the “CODE” section for simplicity.
- Description: (optional) This section is not necessary, however, it helps to stay organized.
- Size: Click on the text field this will display options for you to choose based on your Ad unit size.
- Target Window: Automatically, this is set to “_top,” however, publishers may override it to “_blank” This feature transfers users to a new window when they click on the Ad.
- Placements: (optional) This is a group of ad units together that publishers may sell as one “PACKAGE”. However, this is not relevant if the publisher decides to add separate ads in different sections.
- AdSense Inventory Settings: this should be disabled if the publisher wants to use their own ads of das from clients.
- Ad unit frequency caps: (optional) This enables publishers to set how much certain creatives can be displayed to users.
- Refresh rate: (optional) This aids publishers to set refresh of ads after a certain time interval.
Step 2: Create an Order
Next, publishers should create an order for advertisers, here, publishers set the size, and prices of Ads, and assign the number of creatives to specific line items.
- Name: create an appropriate name for the order.
- Advertiser: identity whose order belongs to, be it a client, then it should be included in the advertiser field. If it is the publisher’s personal ads, it should be included in “House Advertiser”
- Trafficker: automatically sets Google Ad Manager account holder, as the person “in charge.” of the order.
- Labels: enables publishers to further customize their orders.
Step 3: Create a Line Item
This is where you will set your Ads to be delivered.
- Name: give an appropriate name to Name your line item
- Inventory Sizes: Click on the text field, this will enable you to choose your ad size from the drop-down.
- Labels: this will permit further customization of your order.
- Comments: an organization tool for publishers use.
- Custom Fields: This is created in the admin field and is used to organize reports.
Creating your line items will help improve your user experience when browsing through your content. It give you the ability to control where your ads are displayed on your website or blog.
Step 4: Add Creatives
Publishers need to enter creatives and ads from clients. The steps necessary for this are;
- Click on the preferred line item and select the Add Creatives icon.
- Upload selected ad graphics to the file section that appears.
- When your graphics as loaded, include your click-through URL.
- Next, you need to approve the ad before it is displayed on your site.
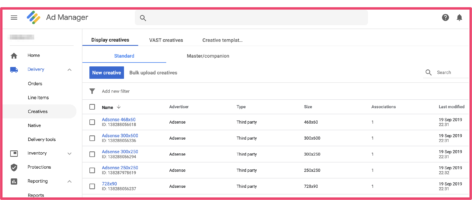
The above steps help you create your various creatives to fit your desired inventory on your website or blog.
Conclusions
Following these outlined steps, publishers should be able to use the Google Ad Manager and its various benefits to manage their ad platforms.
Google Ad manager complete guide that helps publishers increase their earnings as it gives publishers the opportunity to sell their inventory to the highest bidders.
This significantly increases their earnings as compared to just using AdSense to monetise your traffic. Although it’s not always easy setting it up. We are open to helping publishers set up their Ad managers in order to increase their revenue.
Let us know what you think of the post in the comment section.


6 Responses
Very Useful especially for some of us that struggle with understanding how to use bucky Google platforms. This is detailed and very easy to understand. Those images also help a lot. Please the same for Facebook ads manager as well. it will go a long way.
Cheers
Hi…
Good to know it helps and we actually did something exactly for Facebook Ads manager as well here: https://bit.ly/34lqPp9
Very useful post, thank you!
Thanks a lot for reading.
Glad it helps.
This article gives an excellent overview of the backend of Google Ad Manager. However, I still miss an explanation about how to insert the ads created in Google Ad Manager into your own website.
In my opinion, the biggest challenge for webmasters is to correctly match header and body tags.
Websites based on WordPress can solve this problem with a plugin that allows importing and injecting these ads with one click. In doing so, the plugin takes over the task of merging the respective tags.
There are a lot of videos on YouTube that explains in detail how to insert the ads codes created in Google Ad Manager. However, thanks for pointing it out. I will update the post soon with details on how to insert the codes on WordPress and other blogging platforms.